Easy No-Bake Avalanche Cookies: Your Holiday Season Secret Weapon
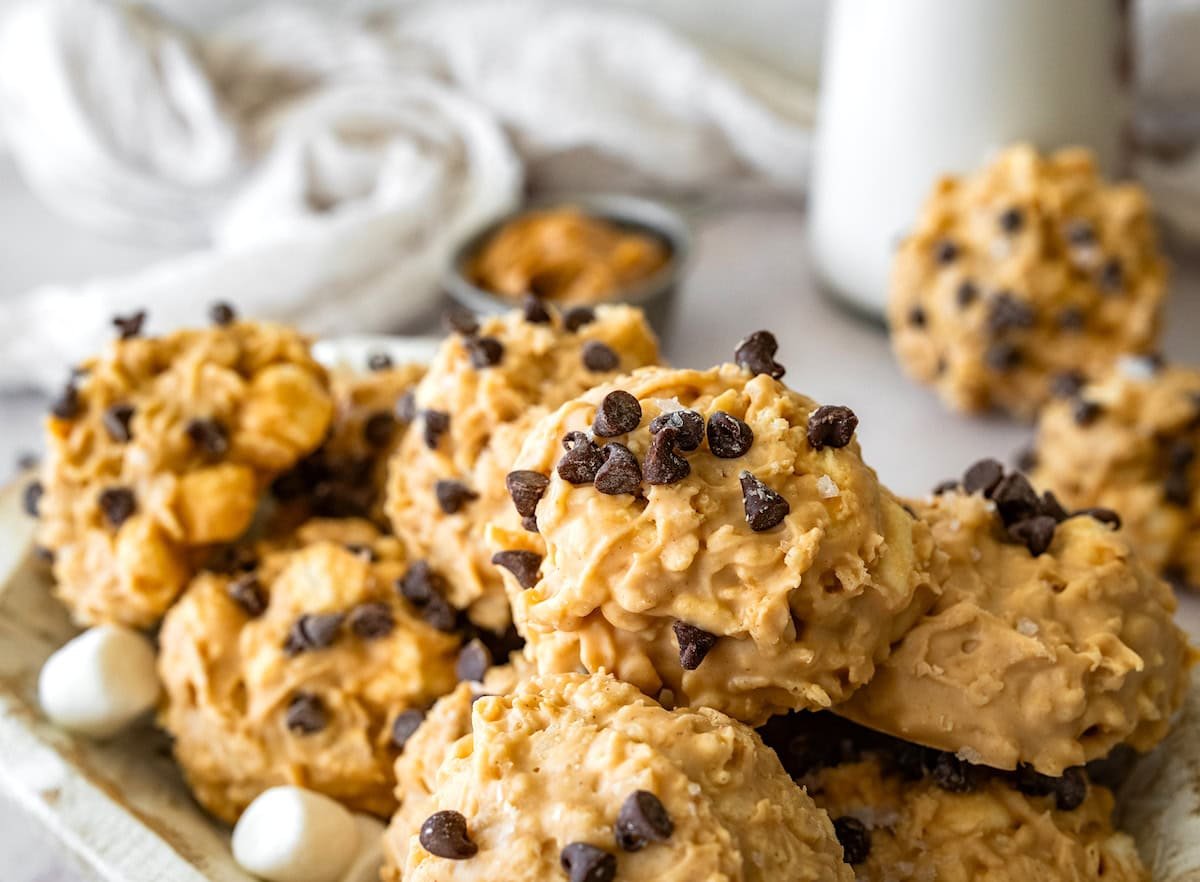
The holiday season is a whirlwind of festive cheer, gift-giving, and, of course, delicious food. But amidst the hustle and bustle, who has time for complicated baking recipes that demand hours in the kitchen and constant oven monitoring? Enter the hero of holiday treats: easy no-bake avalanche cookies! These delightful confections are a game-changer, offering a perfect blend of creamy, crispy, and sweet textures without ever needing to turn on your oven. Imagine soft mini marshmallows and crunchy rice cereal enrobed in a luscious white chocolate and peanut butter coating, then adorned with festive toppings – all ready in minutes. It's no wonder these avalanche cookies have become a must-make holiday tradition for so many.Why Avalanche Cookies Are a Holiday Must-Make
When it comes to holiday baking (or rather, no-baking!), these creamy, crispy avalanche cookies truly stand out. Their simplicity and irresistible flavor profile make them a favorite for both seasoned home cooks and culinary beginners alike.- The Ultimate No-Bake Brilliance: In a season where your oven is likely booked solid with roasts, casseroles, and traditional baked goods, the no-bake nature of these avalanche cookies is a blessing. All you need is a microwave or stovetop for melting, freeing up valuable oven space and your time.
- Speed and Simplicity: These cookies live up to their "easy" title. From start to finish, you can have a batch ready in mere minutes, making them ideal for spontaneous holiday gatherings, last-minute gift ideas, or when a sudden craving for something sweet strikes.
- Perfect for Every Occasion: Whether you're hosting a Christmas party, contributing to a cookie exchange, assembling a festive dessert platter, or looking for a delightful treat to gift, these avalanche cookies fit the bill. Their charming appearance and universally loved flavors make them a hit with everyone.
- Effortlessly Portable: Need a dessert that travels well? These bars are sturdy and hold their shape, making them perfect for potlucks, picnics, or even as a special treat in a lunchbox. Pack them in an airtight container or a Ziploc bag, and they're ready for adventure.
- Year-Round Delight: While we champion them as a holiday treat, don't limit yourself! These versatile cookies can be enjoyed any time of year. Simply swap out holiday-themed sprinkles for rainbow ones or mini chocolate chips, and you have a fantastic treat for any season.
The Essential Ingredients for Perfect Avalanche Cookies
The magic of avalanche cookies lies in their short and sweet ingredient list. Each component plays a crucial role in creating that signature balance of creamy, crunchy, and sweet.- Creamy Peanut Butter: This is a cornerstone of the avalanche cookie experience. For the best results, opt for a creamy, well-stirred peanut butter like Jif or Skippy. These brands provide a smooth, consistent texture and usually contain a little sugar, which complements the white chocolate beautifully. Avoid natural peanut butters where the oil separates significantly at the top; the excess oil can make your mixture greasy and prevent it from setting correctly. The goal is a rich, emulsified base.
- White Chocolate Chips: The base of your irresistible coating! High-quality white chocolate chips will yield the best flavor, offering a sweet, buttery counterpoint to the peanut butter. While white chocolate is traditional, you can experiment with milk or semi-sweet chocolate chips for a different flavor profile, though it will alter the classic "avalanche" look and taste. Always melt gently to prevent scorching.
- Crispy Rice Cereal: This is where the "avalanche" crunch comes in! Rice Krispies or any brand of crispy rice cereal will work perfectly. The key is to use fresh cereal to ensure maximum crispiness. Stale cereal will result in a less satisfying texture, so grab a new box for optimal results.
- Miniature Marshmallows: These delightful little clouds of sweetness add a soft, chewy, and gooey element that makes every bite truly exceptional. They melt slightly into the warm chocolate-peanut butter mixture, then firm up as the cookies cool, creating that signature soft texture amidst the crunch.
- Topping of Choice: While delicious plain, toppings elevate your avalanche cookies to another level. Miniature chocolate chips (often frozen briefly to prevent melting into the warm mixture) are a classic choice, providing an extra pop of chocolate. Festive sprinkles are perfect for the holidays, adding vibrant color and holiday cheer. Consider crushed candy canes for a minty twist, or finely chopped nuts for added texture and richness.
Crafting Your Easy No-Bake Avalanche Cookies: Step-by-Step
Making these holiday treats couldn't be simpler. Follow these straightforward steps for perfect avalanche cookies every time.- Melt the Base Mixture: In a medium to large microwave-safe bowl, combine your white chocolate chips. Microwave in 30-second intervals, stirring well after each, until the chocolate is smooth and fully melted. Alternatively, you can use a double boiler on the stovetop over low heat for a more controlled melt. Once melted, stir in the creamy peanut butter until the mixture is completely combined and lusciously smooth. This creamy base is the heart of your cookies.
- Incorporate the Textures: Gently fold the miniature marshmallows and crispy rice cereal into the warm white chocolate and peanut butter mixture. Work quickly but carefully to ensure everything is evenly coated without crushing the delicate cereal. The warmth of the mixture will slightly soften the marshmallows, creating that desirable gooeyness.
- Press and Top: Line a baking dish (a 9x13 inch pan works well for thinner bars, an 8x8 for thicker ones) with parchment paper or wax paper, leaving an overhang on the sides for easy lifting. Lightly grease the paper for extra non-stick insurance. Transfer the mixture to the prepared pan and, using another piece of parchment paper or lightly greased hands, gently press it down firmly and evenly. Don't compact it too much, but ensure it's a cohesive layer. Immediately sprinkle your chosen toppings – mini chocolate chips, sprinkles, or whatever your heart desires – over the top, gently pressing them into the warm mixture to adhere.
- Chill to Set: Place the pan in the refrigerator for at least 30 minutes to an hour, or until the cookies are firm and fully set. Chilling is crucial for ensuring clean cuts and a stable bar.
- Cut and Serve: Once completely firm, use the parchment paper overhangs to lift the slab of cookies from the pan. Place it on a cutting board. Using a sharp, warm knife (run it under hot water and wipe dry between cuts for the cleanest edges), cut the slab into desired shapes – squares, rectangles, or even festive triangles.
Pro Tips for Avalanche Cookie Perfection
- Don't Overheat Your Chocolate: White chocolate can seize or scorch easily. Melt it slowly and stir frequently to maintain a smooth consistency.
- Work Efficiently: The mixture will start to set as it cools, so once you've mixed in the cereal and marshmallows, move quickly to press it into the pan and add toppings.
- Balance the Sweetness: For an extra layer of flavor, consider adding a tiny pinch of sea salt to your melted chocolate and peanut butter mixture. It helps to beautifully balance the sweetness.
- Creative Customizations: Beyond the standard toppings, try adding a few drops of vanilla extract to the melted mixture for warmth, or a sprinkle of flaky sea salt on top for a gourmet touch. For an extra holiday twist, mix in some finely chopped dried cranberries.
- Gifting with Style: These minutes-to-make avalanche cookies make fantastic gifts. Arrange them in decorative tins, clear cellophane bags tied with festive ribbons, or small boxes. They're always a welcome treat!
Frequently Asked Questions About Avalanche Cookies
Curious about these delightful no-bake wonders? Here are some common questions and answers to help you perfect your batch.
Q: Can I use different types of chocolate instead of white chocolate?
A: Absolutely! While white chocolate gives them their signature "avalanche" look and creamy sweetness, you can certainly experiment with milk chocolate or semi-sweet chocolate chips. Just be aware that this will change the flavor profile and appearance significantly.
Q: What if my natural peanut butter has oil separated at the top?
A: It's best to avoid peanut butter with significant oil separation for this recipe. The extra oil can make the mixture too greasy and prevent it from setting properly, leading to a loose, oily cookie. Opt for creamy, no-stir varieties like Jif or Skippy for the best results.
Q: How long do avalanche cookies last, and how should I store them?
A: Stored in an airtight container at room temperature, these cookies will stay fresh for up to 3-5 days. For longer storage, you can refrigerate them for up to a week. If refrigerated, allow them to come to room temperature for optimal texture.
Q: Can I freeze avalanche cookies?
A: Yes, these cookies freeze beautifully! Place them in an airtight freezer-safe container, separated by parchment paper, for up to 2-3 months. Thaw them at room temperature for an hour or so before serving.
Q: Why are they called "avalanche cookies"?
A: The name likely comes from their appearance! The white chocolate base, studded with the "snowy" marshmallows and "rocky" crispy rice cereal, resembles a snowy avalanche with debris mixed in. It’s a fun, descriptive name for a delicious treat!
